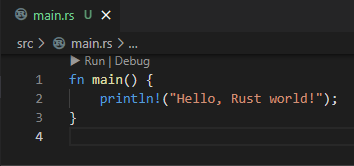
STM32評価ボードでのRust開発環境の構築方法と、サンプルプロジェクトの作成と実行までの手順を記述します。IDEとしてVSCodeを使います。
一通りの手順を経験すれば、他マイコンや自作カスタムボードでの開発環境の構築にも流用できるようになるかと思います。
- 組み込みRustの開発をしてみたい方
- 組み込みRustのデバッグ環境を整えたい方
環境・デバイス
やりたいこと: STM32 NucleoボードのRust開発環境をVSCode上に構築する
PC: Windows10
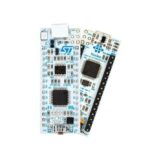
ボード: Nucleo-F303K8
他のSTM32マイコンボードでの環境構築もだいたい同じですので、参考になると思います。
なお、(組み込みでない)Rust開発環境がすでに構築されている状況を想定しています。まだの方は、下のリンクにインストールすべきソフトをリストアップしてありますので、そちらを参照してください。
Rustの特徴や立ち位置にも触れていますので、”そもそもRustって何なの?”という方もご覧ください。
STM32のRust開発環境の構築
デバッグ環境は、ターゲットボード毎に設定が必要になってきます。STM32でデバッグ環境を構築する際に使ったソフトは下記になります。
arm-none-eabi-gdb
ARM用のGDBになります。下記のリンク先からインストーラをダウンロードできます。
GNU Toolchain | GNU Arm Embedded Toolchain Downloads – Arm Developer
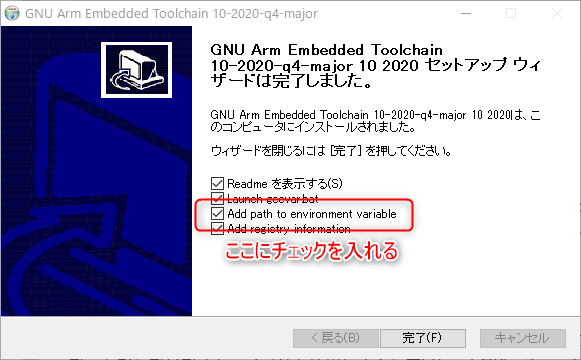
インストーラ起動後は基本的にはデフォルトのままで進めて構いませんが、一点だけ編集しておくと良いです。下図のインストール完了画面にて、環境変数の設定を行うチェックBOXにチェック入れておきます。
インストールが終わったら、PowerShellやコマンドプロンプトを立ち上げて ”arm-none-eabi-gdb -v”と入力します。コマンドはどこのフォルダで入力しても良いです。
正しくインストールが出来て、環境変数が設定されていたら、下記のようにソフトのバージョン情報が表示されます。
PS C:\> arm-none-eabi-gdb -v
GNU gdb (GNU Arm Embedded Toolchain 10-2020-q4-major) 10.1.90.20201028-git
Copyright (C) 2020 Free Software Foundation, Inc.
License GPLv3+: GNU GPL version 3 or later <http://gnu.org/licenses/gpl.html>
This is free software: you are free to change and redistribute it.
There is NO WARRANTY, to the extent permitted by law.
OpenOCD
OpenOnChipDebuggerと言い、GDBとデバッガ間の通信を橋渡しするものです。下記リンク先からダウンロードできます。
Release GNU MCU Eclipse OpenOCD v0.10.0-12 20190422 · ilg-archived/openocd (github.com)
サイトの下部に圧縮ファイルがあるので、対応する環境のものをダウンロードします。
適当な場所に(C:ドライブ直下が無難)”OpenOCD”という名前のフォルダを作り、そこにダウンロードした.zipファイルを解凍保存します。(インストーラは無いようです)
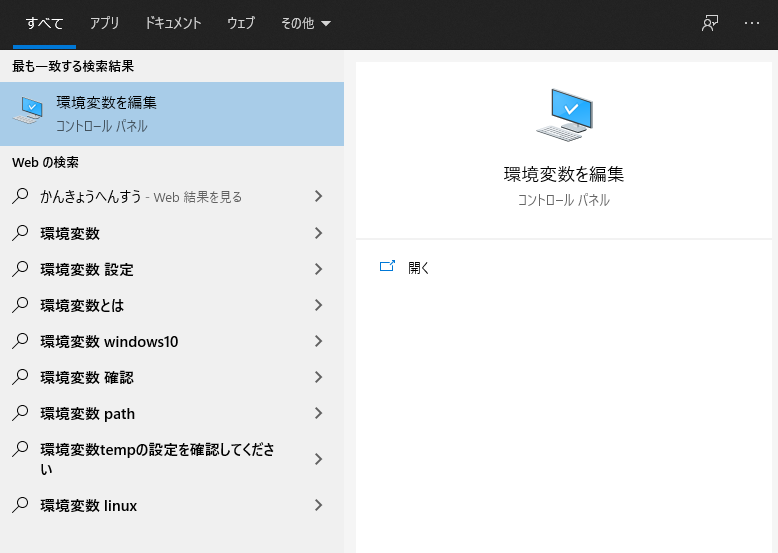
解凍したファイルの中に、”openocd.exe”という実行ファイルがあるはずですので、このファイルまでのpassを環境変数に登録しておきます。環境変数の設定は、検索欄に”環境変数を編集”と打ち込むと選択できるかと思います。
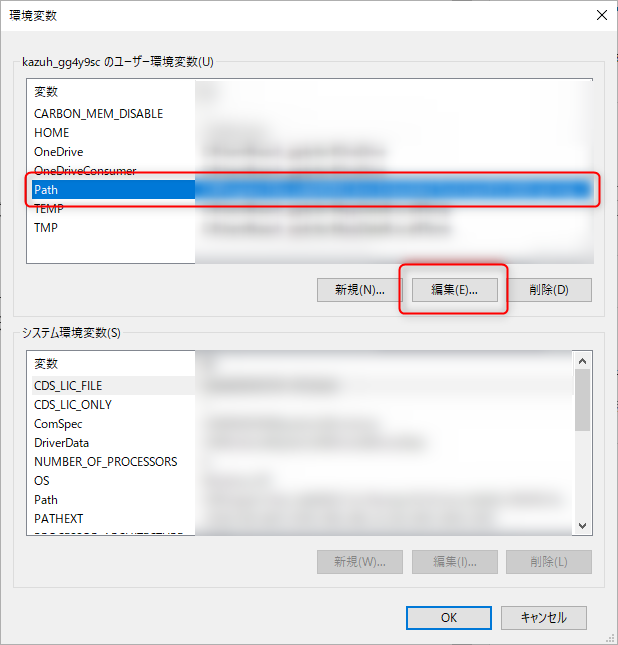
環境変数設定画面が立ち上がったら、Pathを選択して、編集をクリックします。
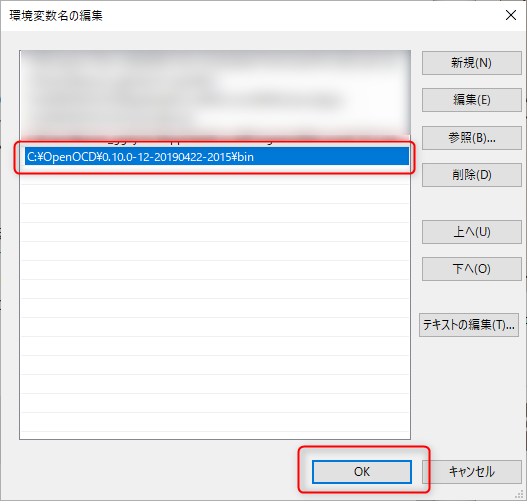
Pathの設定画面が出てきたら、左の空欄に”openocd.exe”までのパスを記載してOKをクリックします。
PowerShellやコマンドプロンプトを立ち上げて ”openocd -v”と入力してみます。コマンドはどこのフォルダで入力しても良いです。ファイルの正しい保存と環境変数設定されていたら、下記のようにソフトのバージョン情報が表示されます。
PS C:\> openocd -v
GNU MCU Eclipse OpenOCD, 64-bitOpen On-Chip Debugger 0.10.0+dev-00593-g23ad80df4
(2019-04-22-20:25)
Licensed under GNU GPL v2
For bug reports, read
        http://openocd.org/doc/doxygen/bugs.html
ここまで来たら、Nucleo-F303K8ボードとパソコンをUSBケーブルで接続して、下記のようにコマンド実行をします。正しくopenocdが起動してボードと接続されたら時には下記のようなログが出力されます。(NucleoのSTLINKのVer等の影響で、ログは微妙に異なると思われます。)
PS C:\> openocd -f interface/stlink.cfg -f target/stm32f3x.cfg
GNU MCU Eclipse OpenOCD, 64-bitOpen On-Chip Debugger 0.10.0+dev-00593-g23ad80df4
(2019-04-22-20:25)
Licensed under GNU GPL v2
For bug reports, read
        http://openocd.org/doc/doxygen/bugs.html
Info : auto-selecting first available session transport "hla_swd". To override use
'transport select <transport>'.
adapter speed: 1000 kHz
adapter_nsrst_delay: 100
Info : The selected transport took over low-level target control. The results
might differ compared to plain JTAG/SWD
none separate
Info : Listening on port 6666 for tcl connections
Info : Listening on port 4444 for telnet connections
Info : clock speed 1000 kHz
Info : STLINK V2J37M27 (API v2) VID:PID 0483:374B
Info : Target voltage: 3.250952
Info : stm32f3x.cpu: hardware has 6 breakpoints, 4 watchpoints
Info : Listening on port 3333 for gdb connections
クロスビルドツールチェイン
Rustのツールチェインがインストールされているならば、コマンドラインから下記でインストールできます。こちらはCortex-M4+FPU のコア用になります。
PS C:\> rustup target add thumbv7em-none-eabihf
info: downloading component 'rust-std' for 'thumbv7em-none-eabihf'
info: installing component 'rust-std' for 'thumbv7em-none-eabihf'他のコア向けで開発する場合は、別途クロスビルドのツールをインストールします。Cortex-Mの主だったツールは下記になりますので、別コアで開発する場合は対応するツールをインストールしてください。
- thumbv6m-none-eabi //Cortex-M0およびCortex-M0+
- thumbv7em-none-eabi //Cortex-M4およびCortex-M7 (no FPU)
- thumbv7em-none-eabihf //Cortex-M4FおよびCortex-M7F (with FPU)
- thumbv7m-none-eabi //Cortex-M3
また、クロスビルドツールが用意されているコアの一覧は下記のコマンドで確認できます。
PS C:\> rustup target list
aarch64-apple-darwin
・・・
thumbv6m-none-eabi
thumbv7em-none-eabi
thumbv7em-none-eabihf (installed)
thumbv7m-none-eabi
・・・
インストール済のものは(installed)と記載されます。
Cargoサブコマンド(Cargo-generate)
PowerShellやコマンドプロンプトから ”cargo install cargo-generate” と入力してcargoのgenerateサブコマンドのインストールを行います。
generateコマンドは、指定したテンプレートからプロジェクトを自動生成するコマンドになります。
VSCodeの拡張機能”Cortex-Debug”
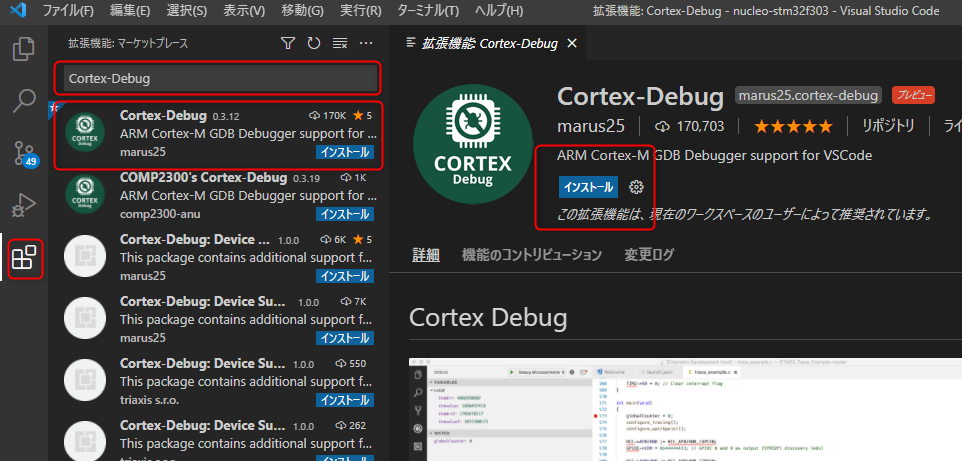
VSCode上でArmマイコンのデバッグを行う拡張機能”Cortex-Debug”をインストールします。この拡張機能によってGDBやOpenOCDが使用され、VSCode上でブレークやステップ実行が行えるようになります。
インストールするには、VSCodeを立ち上げて左端の拡張機能をクリック、検索バーで”Cortex-Debug”と入力すると出てくるインストールボタンをクリックすればOKです。
サンプルプロジェクトの作成と動作確認
ここまでの作業で、必要なツール類は全て揃っているはずです。ここからは、サンプルプロジェクトの作成と動作確認の手順を説明します。
プロジェクトの生成
まずはPowerShellやコマンドプロンプトから下記のコマンドを実行して、Cortex-mテンプレートプロジェクトの生成を行います。コマンドを実行すると、プロジェクト名を聞いてきますので、適当に名付けてください。
cargo generate –git https://github.com/rust-embedded/cortex-m-quickstart.git
プロジェクトは現在のパスに生成されます。全角文字を含まないパスで実行するのが無難です。
PS C:\rust> cargo generate --git https://github.com/rust-embedded/cortex-m-quickstart.git
 Project Name : nucleo-stm32f303
 Creating project called `nucleo-stm32f303`...
 Done! New project created C:\rust\nucleo-stm32f303
上記のような実行結果になれば成功です。命名したプロジェクト名”nucleo-stm32f303”という名前のフォルダが生成されているはずです。
プロジェクトの編集
生成されたテンプレートのままでは、マイコンの設定や実行環境の設定が異なっていて動きません。いくつかのファイルを編集していきます。
.cargo/config.toml
このファイルでは、ターゲットマイコンとデバッグツールの指定を編集します。編集箇所は下記の4か所になります。
- [target.thumbv7m-none-eabi]
→ [target.thumbv7em-none-eabihf] - # runner = “arm-none-eabi-gdb -q -x openocd.gdb”
→ runner = “arm-none-eabi-gdb -q -x openocd.gdb” - target = “thumbv7m-none-eabi” # Cortex-M3
→ # target = “thumbv7m-none-eabi” # Cortex-M3 - # target = “thumbv7em-none-eabihf”
→ target = “thumbv7em-none-eabihf”
編集後は下記のような内容になります。
[target.thumbv7em-none-eabihf]
# uncomment this to make `cargo run` execute programs on QEMU
# runner = "qemu-system-arm -cpu cortex-m3 -machine lm3s6965evb -nographic ...

[target.'cfg(all(target_arch = "arm", target_os = "none"))']
# uncomment ONE of these three option to make `cargo run` start a GDB session
# which option to pick depends on your system
runner = "arm-none-eabi-gdb -q -x openocd.gdb"
# runner = "gdb-multiarch -q -x openocd.gdb"
# runner = "gdb -q -x openocd.gdb"

rustflags = [
  # This is needed if your flash or ram addresses are not aligned to 0x10000 in memory.x
  # See https://github.com/rust-embedded/cortex-m-quickstart/pull/95
  "-C", "link-arg=--nmagic",

  # LLD (shipped with the Rust toolchain) is used as the default linker
  "-C", "link-arg=-Tlink.x",

  # if you run into problems with LLD switch to the GNU linker by commenting out
  # this line
  # "-C", "linker=arm-none-eabi-ld",

  # if you need to link to pre-compiled C libraries provided by a C toolchain
  # use GCC as the linker by commenting out both lines above and then
  # uncommenting the three lines below
  # "-C", "linker=arm-none-eabi-gcc",
  # "-C", "link-arg=-Wl,-Tlink.x",
  # "-C", "link-arg=-nostartfiles",
]

[build]
# Pick ONE of these compilation targets
# target = "thumbv6m-none-eabi"        # Cortex-M0 and Cortex-M0+
# target = "thumbv7m-none-eabi"        # Cortex-M3
# target = "thumbv7em-none-eabi"       # Cortex-M4 and Cortex-M7 (no FPU)
target = "thumbv7em-none-eabihf"     # Cortex-M4F and Cortex-M7F (with FPU)
# target = "thumbv8m.base-none-eabi"   # Cortex-M23
# target = "thumbv8m.main-none-eabi"   # Cortex-M33 (no FPU)
# target = "thumbv8m.main-none-eabihf" # Cortex-M33 (with FPU)
.vscode/launch.json
VSCodeでデバッグを行うための設定ファイルになります。device指定変更します。
- デバイス名変更 ”device”: “STM32F303VCT6”,
→ “device”: “STM32F303K8T6”,
編集後は下記のような内容になります。
{
    /*
     * Requires the Rust Language Server (RLS) and Cortex-Debug extensions
     * https://marketplace.visualstudio.com/items?itemName=rust-lang.rust
     * https://marketplace.visualstudio.com/items?itemName=marus25.cortex-debug
     */
    "version": "0.2.0",
    "configurations": [
        {
            "type": "cortex-debug",
            "request": "launch",
            "name": "Debug (QEMU)",
            "servertype": "qemu",
            "cwd": "${workspaceRoot}",
            "preLaunchTask": "Cargo Build (debug)",
            "runToMain": true,
            "executable": "./target/thumbv7m-none-eabi/debug/nucleo-stm32f303",
            /* Run `cargo build --example hello` and uncomment this line to run semi-hosting example */
            //"executable": "./target/thumbv7m-none-eabi/debug/examples/hello",
            "cpu": "cortex-m3",
            "machine": "lm3s6965evb",
        },
        {
            /* Configuration for the STM32F303 Discovery board */
            "type": "cortex-debug",
            "request": "launch",
            "name": "Debug (OpenOCD)",
            "servertype": "openocd",
            "cwd": "${workspaceRoot}",
            "preLaunchTask": "Cargo Build (debug)",
            "runToMain": true,
            "executable": "./target/thumbv7em-none-eabihf/debug/nucleo-stm32f303",
            /* Run `cargo build --example itm` and uncomment this line to run itm example */
            // "executable": "./target/thumbv7em-none-eabihf/debug/examples/itm",
            "device": "STM32F303K8T6",
            "configFiles": [
                "interface/stlink-v2-1.cfg",
                "target/stm32f3x.cfg"
            ],
            "svdFile": "${workspaceRoot}/.vscode/STM32F303.svd",
            "swoConfig": {
                "enabled": true,
                "cpuFrequency": 8000000,
                "swoFrequency": 2000000,
                "source": "probe",
                "decoders": [
                    { "type": "console", "label": "ITM", "port": 0 }
                ]
            }
        }
    ]
}
Cargo.toml
このファイルでは、ターゲットマイコンの編集を行います。下記3点のコメントアウトを外します。
- # [dependencies.stm32f3]
→ [dependencies.stm32f3] - # features = [“stm32f303”, “rt”]
→ features = [“stm32f303”, “rt”] - # version = “0.7.1”
→ version = “0.7.1”
編集後は下記のような内容になります。
[package]
authors = ["tteio <kazuhiko_sumi@zeptoelecdesign.com>"]
edition = "2018"
readme = "README.md"
name = "nucleo-stm32f303"
version = "0.1.0"

[dependencies]
cortex-m = "0.6.0"
cortex-m-rt = "0.6.10"
cortex-m-semihosting = "0.3.3"
panic-halt = "0.2.0"

# Uncomment for the panic example.
# panic-itm = "0.4.1"

# Uncomment for the allocator example.
# alloc-cortex-m = "0.4.0"

# Uncomment for the device example.
# Update `memory.x`, set target to `thumbv7em-none-eabihf` in `.cargo/config`,
# and then use `cargo build --examples device` to build it.
[dependencies.stm32f3]
features = ["stm32f303", "rt"]
version = "0.7.1"

# this lets you use `cargo fix`!
[[bin]]
name = "nucleo-stm32f303"
test = false
bench = false

[profile.release]
codegen-units = 1 # better optimizations
debug = true # symbols are nice and they don't increase the size on Flash
lto = true # better optimizations
memory.x
フラッシュメモリとRAMのアドレスおよび容量を設定していきます。
- FLASH : ORIGIN = 0x00000000, LENGTH = 256K
→ FLASH : ORIGIN = 0x08000000, LENGTH = 64K - RAM : ORIGIN = 0x20000000, LENGTH = 12K
→ RAM : ORIGIN = 0x20000000, LENGTH = 12K
編集後は下記のような内容になります。
MEMORY
{
  /* NOTE 1 K = 1 KiBi = 1024 bytes */
  /* TODO Adjust these memory regions to match your device memory layout */
  /* These values correspond to the LM3S6965, one of the few devices QEMU can emulate */
   FLASH : ORIGIN = 0x08000000, LENGTH = 64K
   RAM : ORIGIN = 0x20000000, LENGTH = 12K
}

/* This is where the call stack will be allocated. */
/* The stack is of the full descending type. */
/* You may want to use this variable to locate the call stack and static
   variables in different memory regions. Below is shown the default value */
/* _stack_start = ORIGIN(RAM) + LENGTH(RAM); */

/* You can use this symbol to customize the location of the .text section */
/* If omitted the .text section will be placed right after the .vector_table
   section */
/* This is required only on microcontrollers that store some configuration right
   after the vector table */
/* _stext = ORIGIN(FLASH) + 0x400; */

/* Example of putting non-initialized variables into custom RAM locations. */
/* This assumes you have defined a region RAM2 above, and in the Rust
   sources added the attribute `#[link_section = ".ram2bss"]` to the data
   you want to place there. */
/* Note that the section will not be zero-initialized by the runtime! */
/* SECTIONS {
     .ram2bss (NOLOAD) : ALIGN(4) {
       *(.ram2bss);
       . = ALIGN(4);
     } > RAM2
   } INSERT AFTER .bss;
*/
STM32F303.svd
このファイルは、マイコンのレジスタ情報などが記述されているファイルになります。無いとデバッグ中にレジスタの中身が確認できません。ファイルを入手して、/.vscode/フォルダに保存します。
STM32F303.svdファイルは下記のリンク先から入手できます。
cmsis-svd/STM32F303.svd at master · posborne/cmsis-svd (github.com)
サンプルコード作成と実行
サンプルコード
Nucleoボード上のLD3を点灯させるサンプルコードを用意しました。下記になります。
#![no_std]
#![no_main]

// pick a panicking behavior
use panic_halt as _;
// you can put a breakpoint on `rust_begin_unwind` to catch panics
// use panic_abort as _; // requires nightly
// use panic_itm as _; // logs messages over ITM; requires ITM support
// use panic_semihosting as _;
// logs messages to the host stderr; requires a debugger

use cortex_m_rt::entry;
use stm32f3::stm32f303;

#[entry]
fn main() -> ! {
    let peripherals = stm32f303::Peripherals::take().unwrap();

    peripherals.RCC.ahbenr.modify(|_, w| w.iopben().enabled());

    let gpiob = &peripherals.GPIOB;
    gpiob.moder.modify(|_, w| w.moder3().output());
    gpiob.otyper.modify(|_, w| w.ot3().push_pull());
    gpiob.bsrr.write(|w| w.bs3().clear_bit());

    loop {
        gpiob.bsrr.write(|w| w.bs3().set());
    }
}
このコードを src/main.rs ファイルにコピペしていただければよいです。GPIOの初期化と、メインループ内でのHigh出力のみの簡単なコードです。
サンプルコードの実行
最後に、サンプルコードのデバッグ実行をしてみます。以下の操作をします。
- PCとNucleoボードをUSB接続
- VSCode左端の実行とデバッグをクリック
- 左上のプルダウンメニューからDebug(OpenOCD)を選択
- メニュー左の▷をクリック
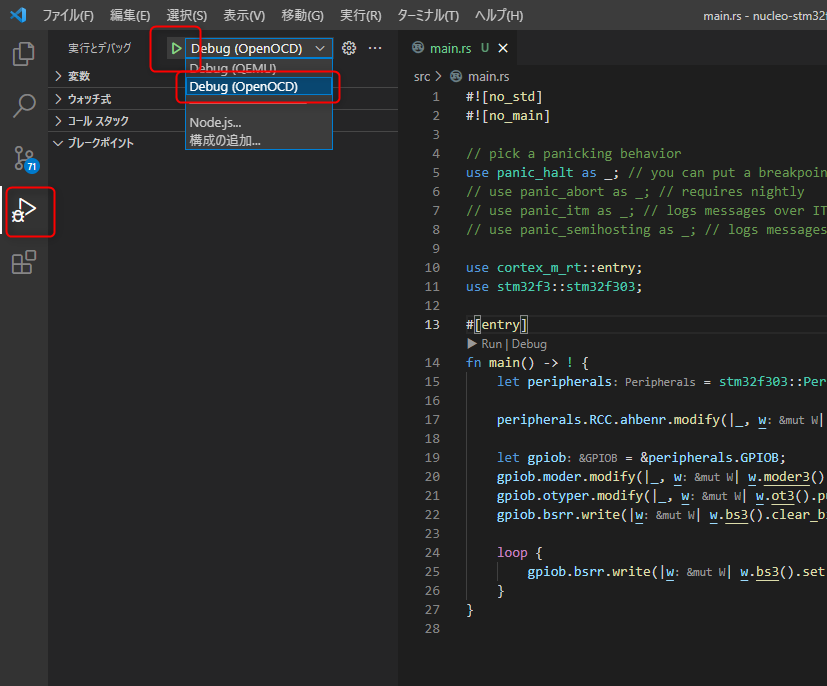
うまく設定出来ていれば、ビルドが始まり、ボードに書き込みが行われ、”#[entry]“の行でブレークした状態になります。下のような画面になります。
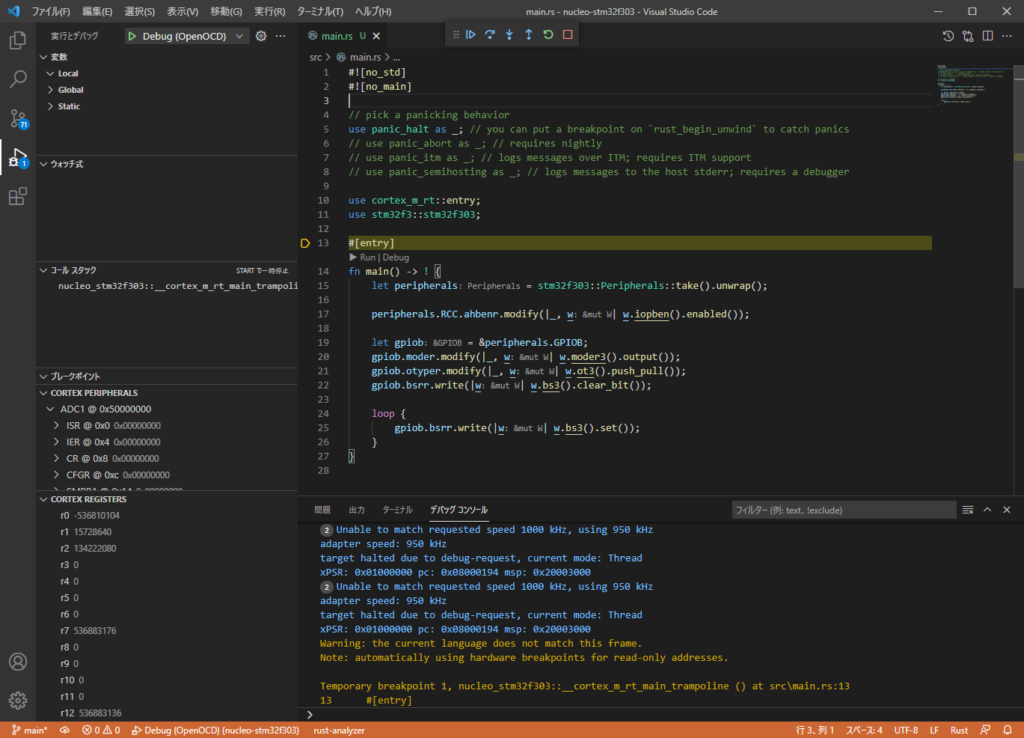
画面上部中央付近に、デバッグメニューが出ています。続行(F5)をクリックすれば、LD3が点灯すると思います。
ブレークポイントを貼ったり、ステップ実行したり、レジスタの内容を確認したりといった、基本的なデバッグ操作は一通りできますので、組み込みRustの開発や学習が捗ると思います。
参考記事
この記事で構築した開発環境とボードで組み込み開発を進めるための記事を書いています。よろしければこちらも参考にしてください。
コメント